Continuing with our tutorial series in using Unity to create animations for film, TV, or game cut-scenes, it is time we explore the use of post-processing tools to impact the lighting and feel of a scene.
Just in case you missed the previous tutorials; in part 1 we set up an HDRP Unity project. In part 2 we set the basic scene, corrected a couple of scripting errors, and set the scene lighting parameters to give us real-time CGI. In part 3 we added animation, basic cameras, and recorded a simple animation.
For this tutorial, I am using Unity 2019.2. While this tutorial is only about post-processing, it does build upon the previous tutorials.
Post-process allows you to change the lighting effects at runtime within your game or cinematic work. This can have huge benefits for creating cinematic shorts, dramatically reducing the time needed in post-processing with other software such as Premiere Pro or Nuke.
The post-process effect is attached to a camera, so you will only see the rendered effects if you have the Game tab selected in the Unity editor. You can have more than one camera with different post-process effects attached to the different cameras (specifically if you are using Cinemachine, this is a useful feature).
Unity 2019 has two implementations of Post-processing. If you select HDRP for your base project, post-processing is already included. DO NOT load post processing via the Package Manager, it is a different version than the one included with the HDRP project.
If you are using one of the other Unity templates (2D, 3D, or LWRP), you will need to add Post-processing via the Package Manager (directions are provided below).
Generally, when adding a post-process to a scene (i.e, NOT in HDRP), you must add a post-processing layer to the camera then add a post-processing volume to the hierarchy (details on how to do this are below). Once the post-processing volume is added, you can then change the various post-processing setting for your environment.
The HDRP template scene begins with a Default Post-process and a Scene Post-process in the Hierarchy. No need to add a post-process layer to the camera to get started. If you accidentally (or on purpose) delete any of the sample scene objects, they can be found in your Project Assets in the HDRPDefaultResources folder.

POST-PROCESS VOLUMES
The default Post-production (V.2) volumes (the effects that are available in 2D, 3D, and LWRP templates) include:
Anti-aliasing – reduces rough or jagged edges on straight lines.
Ambient Occlusion – effects the brightness of light on a surface
Auto Exposure – adjusts to light level over time, similar to walking into a dark room from a bright room.
Bloom – creates a fringe or halo around bright objects.
Chromatic Aberration – impacts how the camera joins colors, useful for creating a drugged or drunk effect.
Color Grading – corrects or alters the color in a scene allowing you to shift the color toward a specific range.
Depth of Field – causes the camera to show items clearly or blurry based upon where they are in the scene. i.e. close items are clear, distant objects are blurry.
Grain – adds noise or grainy appearance to objects in the scene.
Motion Blur – As you might guess, creates the blur effect when something is moving fast.
Screen-space reflections – used to create wet surface effects. Not for use on mobile platforms.
Vignette – darkens the edges of the scene, bringing attention to the center of the image.
Fog – Located under lighting, allows the addition of fog effect in the scene.
Post-process in the HDRP template includes the override effects:
Bloom – creates a fringe or halo around bright objects. In HDRP, Bloom uses PBR, thus lighting & materials must be properly configured for best results.
Channel Mixer – modifies the color channel(s), allowing a color shift in the final output.
Chromatic Aberration – – impacts how the camera joins colors, useful for creating a drugged or drunk effect.
Color Adjustments – allows camera adjustment to the contrast, color filter, hue shift, saturation, and post-exposure.
Color Curves – provides grading curves to adjust hue, saturation or luminosity.
Depth of Field – causes the camera to show items clearly or blurry based upon where they are in the scene. i.e. close items are clear, distant objects are blurry.
Film Grain – similar to Grain in Post-process V2, but with much more control and texture capacity.
Lens Distortion – creates a distortion effect similar to a traditional camera lens.
Lift, Gama, Gain – creates an effect controlling darker tones, mid-range tones, and lighter tones respectively.
Motion Blur – simulates motion blur due to a fast-moving object. HDRP provides more controls than post-process V.2.
Panini Projection – used for scenes with a large field of view to keep a perspective view.
Shadows, Midtones, Highlights – controls the shadows, midtone color values, and highlight colors.
Split Toning – tinting effect allowing the addition of different color tones to shadows or highlights.
Vignette – darkens the edges of the scene, bringing attention to the center of the image.
White Balance – used to remove unrealistic colors, or to create colder or warmer scenes.
HDRP post-process also adds controls for lighting, fog, raytracing, shadowing, sky, and the visual environment, all of which are controlled in different areas of non-HDRP projects but are centralized in the post-process in HDRP projects.
USING POST-PROCESS IN NON-HDRP
To include post-process in a non-HDRP project (the 2D, 3D, 3D Extras, and LWRP templates), you must add Post Processing via the Package Manager windows (Window > Package Manager).
In the Package Manager, make sure that All packages is selected in the top left corner, then scroll down to Post Processing. Click the Install button in the bottom right corner.

To use post-processing, you will need to add a post-process layer to your camera. With the Camera selected, either click the Add Component in the Inspector window or select from the Component menu Rendering > Post-process Layer. The Post Process Layer (Script) will be added to the Camera. So that you can best see everything that we change, change the Layer property to Everything.

Now that we have a post-process layer, we need to add a post-process volume file. The volume file contains the effects to be included in the post-processing. To add a post-process to the scene, right-click in the Hierarchy and select 3D > Post-process Volume.

Select the Post-process Volume in the Hierarchy. In the Inspector you can now begin creating a Post-process Volume file. Click the New button beside the Profile under Post Process Volume (Script) in the Inspector window. This will create a script file to hold your effects.

Be sure to turn Is Global on so that you can see the effects within the scene.
Now that the file is created, you can begin to add effects to the scene. Click Add Effect in the Inspector window.
Add the Bloom effect.
Click the box beside Intensity and raise the Intensity and watch the effect Bloom on your scene (remember: You must have the Game tab selected).


You can include as many effects as you like in one file. You can also have different Post-process Volume files and swap out the effects at different times or apply them to different cameras.
USING POST-PROCESS IN HDRP
As mentioned earlier, post-process tools are included by default with the HDRP template. As with non-HDRP templates, the effects are included in volume files. To create a new volume profile, select the Default Post-process in the Hierarchy. In the Inspector window, find the Volume (Script) section. The currently associated profile file is listed in the Profile textbox. You can create a new one by clicking the new button or clone the current file by clicking the clone button.

Current overrides are listed under Volume (Script) in the Inspector. You can also work with the Volume Profile by selecting it in your Project Assets folder. The Default Volume Profile files are in the HDRPDefaultResources folder.

Select DefaultPostprocessingSettings and you can see and modify the overrides in the inspector.

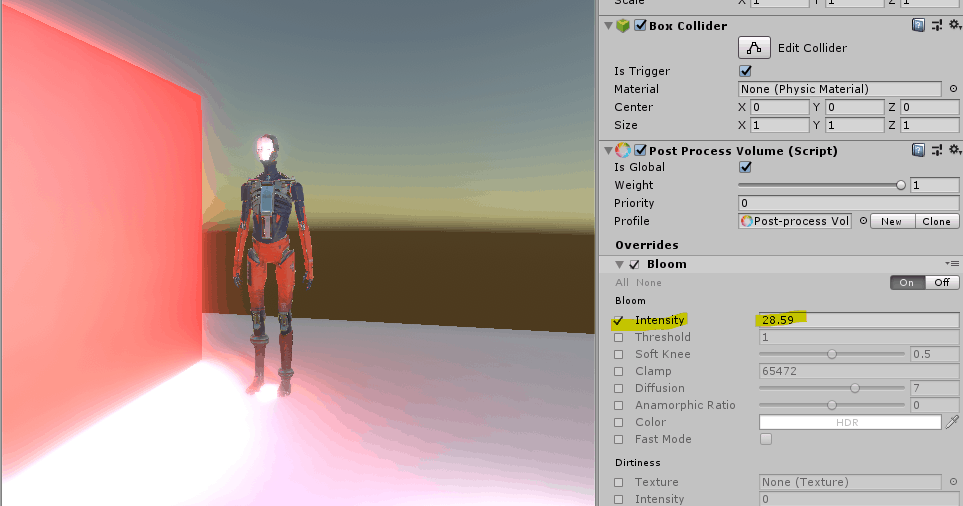
With your Game tab selected, change the Bloom Intensity and watch the impact upon your scene. In the image below I modified the Bloom Intensity and changed the Tint to red:

You can add additional overrides to the volume profile by clicking on the Add Override button at the bottom of the Inspector window.
When you click on Override, you will be given many options. Post-processing is under the Post-processing option.


Here I have reset the Bloom and added Film Grain to the default scene:

Post-processing provides many effects that can have a dramatic effect on your scene. It will take some practice to gain proficiency and the right look and feel for your environment, but fortunately, if you make a mistake, it is easy to reset the effect and try again.
What would you like to learn more about? Is there a specific area of post-processing or cinematic development with game engines that you would like to see covered?